IPsec VPN
IPsec VPN enables secure encrypted communication between geographically distributed networks, sites, and infrastructure environments. This capability can be used for Site-to-Site connectivity between branch offices, data centers, and other enterprise locations.
To create an IPsec connection, configure an incoming connection on NGFW and an outgoing connection on the other NGFW. Configure an outgoing connection on NGFW-1 and an incoming connection on NGFW-2.
Step 1: Checking the Connection Conditions
Section titled “Step 1: Checking the Connection Conditions”-
Verify Time Zone Configuration. Ensure that the time zones on NGFW-1 and NGFW-2 are configured correctly. Proper time synchronization and consistent time zone settings are important for accurate system operation and troubleshooting.
-
Verify your network ranges. Verify that all subnets involved in the IPsec VPN connection are distinct and do not overlap. Overlapping subnets may cause routing conflicts and prevent successful communication between networks.
-
Configure the Incoming Connection. Ensure that one of the servers has a public IP address assigned by the Internet Service Provider (ISP). Configure the incoming connection on the server that has the public IP address to ensure that external traffic reaches the appropriate endpoint.
-
Verify Firewall Rules for IPsec Traffic. Navigate to Traffic Rules → Firewall → INPUT and verify that custom firewall rules do not block incoming ESP traffic or UDP traffic on ports 500 and 4500 at the external interfaces of NGFW-2. These protocols and ports are required for IPsec connection establishment and operation.
-
Verify VPN Network Addressing. Ensure that the networks configured for the VPN connection between NGFW-1 and NGFW-2 do not overlap. Using distinct network ranges helps prevent routing conflicts and ensures proper communication between the connected networks.
Step 2: Initial Configuration of the Outgoing Connection
Section titled “Step 2: Initial Configuration of the Outgoing Connection”Complete the following preliminary steps on NGFW-1:
-
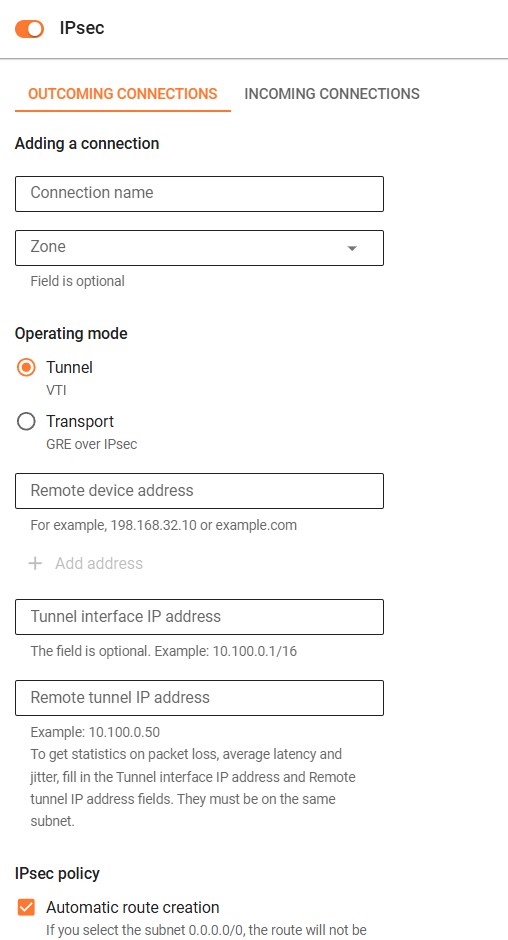
Navigate to Services → IPsec → Outgoing Connections, then click Add to create a new outgoing connection.
-
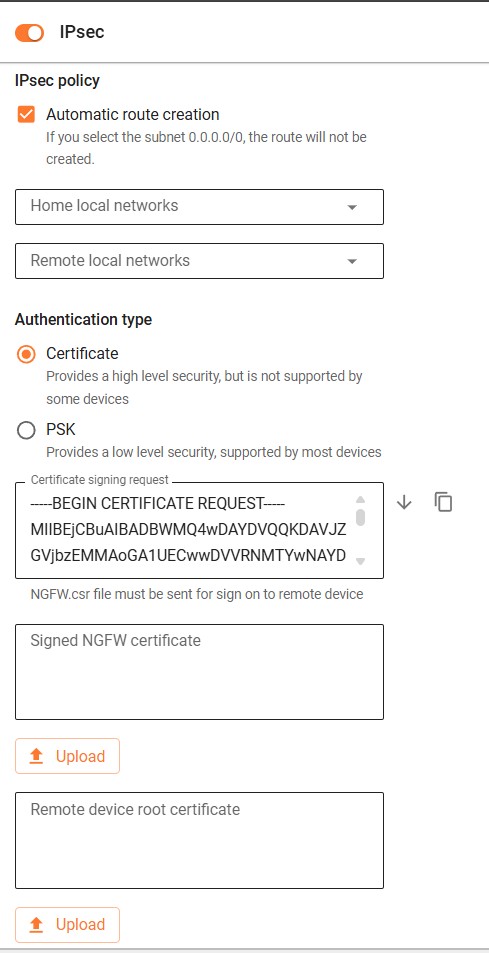
Fill in the fields:
-
Proceed according to the selected authentication method:
- Pre-Shared Key (PSK): verify that all fields are configured correctly, then click Add Connection. Once the connection has been added, proceed to Step 3.
- Certificate: keep the outgoing connection configuration form open without closing it. Proceed to Step 3 to configure the incoming connection on NGFW-2.
Step 3: Configuring the Incoming Connection
Section titled “Step 3: Configuring the Incoming Connection”Follow these steps on NGFW-2:
-
Go to Services → IPsec → Incoming Connections and click Add.
-
Fill in the fields:
-
Verify that all required fields are configured correctly, then click Add Connection to save the incoming connection configuration.
- PSK authentication: if Pre-Shared Key (PSK) authentication was selected, the configuration process is complete.
- Certificate authentication: if certificate-based authentication was selected, proceed to Step 4 to complete the configuration.
Step 4: Setup Outgoing Connection Using Certificate-Based Authentication
Section titled “Step 4: Setup Outgoing Connection Using Certificate-Based Authentication”-
On NGFW-2, navigate to Services → IPsec → Incoming Connections and select
 the previously created incoming connection to open its configuration settings.
-
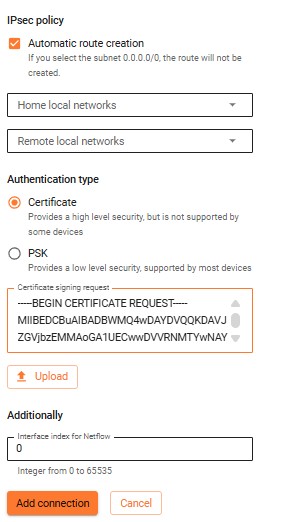
Copy the Device Signed Certificate and NGFW Root Certificate fields:
-
In NGFW-1, go to Services → IPsec → Outgoing Connections.
-
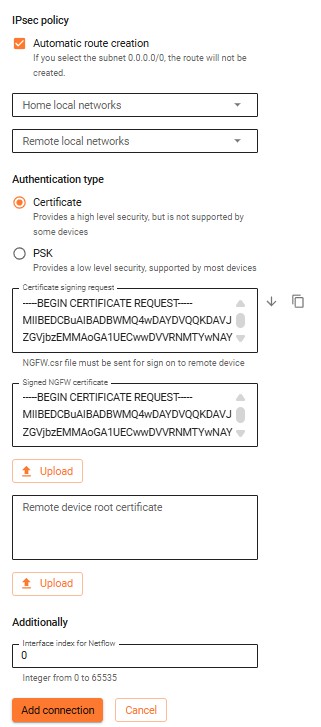
Fill in the NGFW Signed Certificate and Remote Device Root Certificate fields with the values previously copied from NGFW-2:
-
Check that the fields are filled in correctly and click Add connection.